If you have ever used a Linux-based system before such as Ubuntu, Debian, Fedora, etc. you may have become used to using the terminal and especially a very important command named “grep”.
In this article, we will be explaining what is the Windows equivalent of grep and how to access and use it.
What Is The Grep Equivalent On Windows 10 And 11
The Windows equivalent of the ever so popular grep command is named findstr and can be used right from within the Windows CMD terminal.
If you want to use a grep alternative on your Windows Powershell you will need to use the Select-String command and not the findstr command.
Ok with the above being said, we will cover how to use either one of these commands in your CMD prompt shell or the other command if you using the Windows PowerShell.

Let’s Begin…
Ok, first things first make sure you have your Windows CMD shell open, To do this press the Windows key + R type in “cmd” and press the enter key.
How To Use The Findstr Command In The Windows CMD Shell
This is the way most of you will decide to use Findstr as it’s the most used way to find a string within one of your files and is the same way you would use the grep command on Linux-based systems.
You can run the command below which will search for your string inside of any file you need to check.
To search for a string inside any text files with the extension you can run this command below:
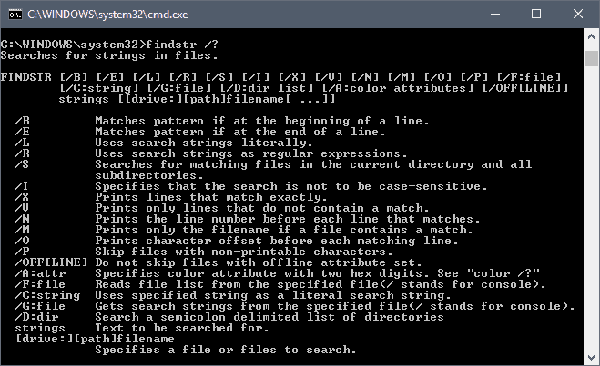
Findstr /i "hello" *.txtWhat the above command does is the first command Findstr will prompt the command shell to use the program Findstr.
Then the /i tells the command to make sure your searching case insensitive.
The string is “hello” so you can change this to whatever name or value you are searching for within the file/files.
The *.txt tells the command to search all the files within the directory you are in that end in .txt and the * tells it to search through all txt files.
See Is Windows Desktop Runtime A Safe Process.
If you would like to search just one file you can change this to something like windows.txt which will just search a file named windows for your string.
Ok, let’s move on to the next way how you may want to use the Findstr command in the Windows CMD terminal.
Find Specific Tasks Running On your Windows PC
When you want to find a file or even a service name on your Windows you will run the Find command and not the Findstr as we want to find something and not just list the strings from within a file.
We will be giving you an example of how to find Windows Explorer which is always running in the task manager of your Windows operating system.
The name of the task is called explorer so you will run this command below
tasklist | Find "Explorer"
Then you will quickly be able to see the .exe name of the task and also its process number and how much memory it’s using on your resources.
If you are a Windows PowerShell user we will cover how to use the Windows grep equivalent called “Select-String” from within the PowerShell interface.

How To Use The Select-String Command In Windows PowerShell
Here at Tech Spec HQ, we prefer using Windows Powershell due to the administrator task we can run, and have become accustomed to using this great shell over the standard CMD prompt terminal.
See If Its Better To Have Windows Game Mode Switch ON Or OFF.
So fire up your Windows Powershell and let’s get down to business.
Let’s use an example of you have a file named BigFile.txt and you want to find the string called “windows” then you would run this PowerShell String-Select below.
> Select-String -Path "BigFile.txt" -Pattern "windows" -CaseSensitiveOk, let’s dive into each prompt inside the command to see what each command is doing.
- The Select-String is needed to tell Windows Powershell what program we will be running.
- The -Path command tells Select-String where the file is located.
- The -Pattern followed by the “windows” tells Poweshell we want to run a string search with the string of windows.
- And finally, the -CaseSensitive is making the search for the string case sensitive. (You can take this part off if you want the search to not be case-sensitive.
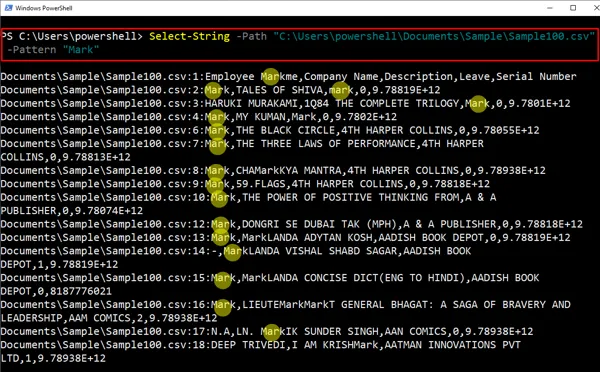
After the search has run you will find the string if Select-String finds it ouputted in your PowerShell window.
Conclusion
There you have it an alternative equivalent to the Grep command but for any Windows operating system and how to perform the commands in both the Windows CMD prompt and also in Windows PowerShell.





Leave a Reply