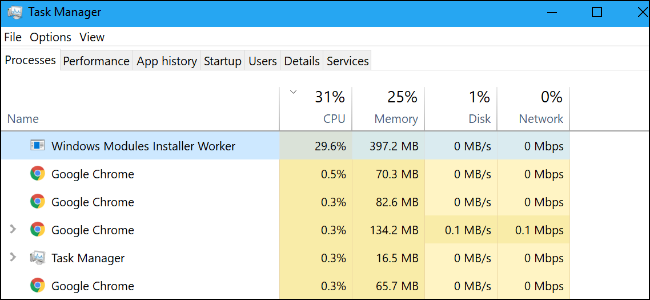
Have you noticed your Windows PC started to freeze and hang and when you checked the Windows task manager you see the culprit with the high CPU % is a process named “Windows module installer worker” but you are unsure what it is and how to fix it.
Rest assured this article will cover everything you need to know about the Windows module installer worker high CPU problem.

What Is The Windows Module Installer Worker?
The Windows module installer installer is a process that is tied to the Windows update service which helps with automatic updates of Windows components and drivers needed.
The file that the Windows module worker uses is a file process called TiWorker.exe and if you was to end this process in the Windows task manager it would stop Windows from updating itself until you have rebooted your Windows PC.
With the Windows module installer being a system-based process there is no way to delete this process as it’s needed to run your Windows operating system correctly.
See What Is SearchApp.exe On Windows 10 And How To Disable It.
Why Is The Windows Module Worker Causing High CPU Usage
The reason the Windows module worker can cause high CPU usage is your Windows operating system can be updating itself in the background with the latest security patches and new features from Microsoft.
Sometimes when the process is using a lot of CPU percent it can point towards some of your hardware in your Laptop or PC failing such as the CPU or hard drive which can certainly make this specific process work harder.
Also, you may want to check that your PC has not got any viruses or malware which can cause a high CPU % with this same process.
Learn about Windows 11 & 10 Optional Features.
Can The Windows Module Installer Worker Process Be Disabled
It’s not advisable to disable due to the Windows module installer worker being a system-based process, If decide to disable this process then you won’t receive the crucial updates that Microsoft sends to their Windows operating systems for security and new features.
We will be covering 3 ways on how you can quickly fix the high CPU with this problem and if you are in a pinch for time we highly recommend the second method below which is the fastest temp fix.
See everything there is to know about the Windows Input Experience (Winex).
How To Fix The Windows Module Installer Worker High CPU Issue
If you do wish to temporarily disable then you can follow the below steps.
1. Disable The Windows Module Installer Worker Using Windows Services
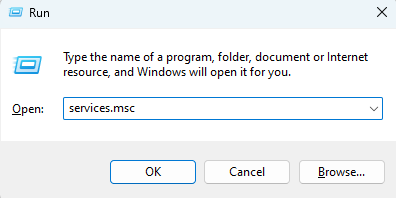
Press the Windows key + R which will open the rum window then type in services.msc and press enter to enter Windows service manager.
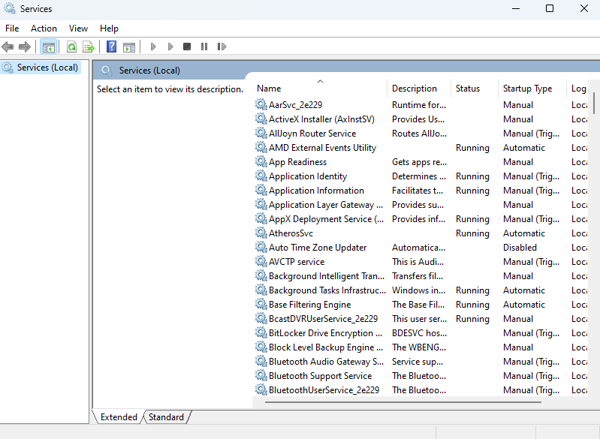
Once you have the Windows services manager console open then scroll down to the Windows Update Service and right click on it then choose properties.
Want more Windows Tips & Tricks? Go to Tech Spec Dude to see more.
After the new properties window has popped up where you see the startup type change this to Disabled then click on Apply.
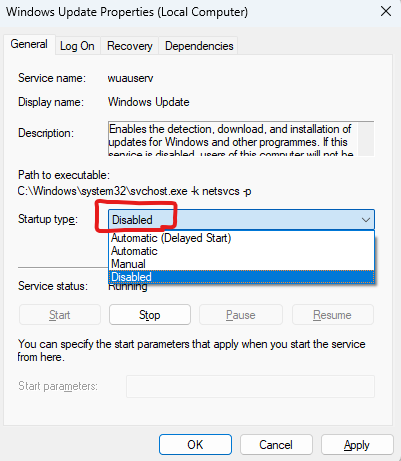
You will now notice under the column named Startup type that the Windows Update has been disabled.
Now reboot your Windows PC for the changes to take effect.
Please note: If you have this set to disabled you will not be able to update Windows but you can have the service set to manual and then update Windows as and when you need to.
2. Set Your Network Connection In Windows To A Metered Connection
This is the fastest way to stop the Windows module installer worker from running and it’s to set your PC or laptop wifi or ethernet connection to a metered connection.
1. Press the start icon (Windows icon) then click on Settings (cog icon) Then choose Network & Internet on the left-hand side menu.

2. Choose the network type you are using such as Wi-Fi or Ethernet.
You will now see the Wifi name you connected to so choose this and then you will see a metered connection Make sure to enable this.
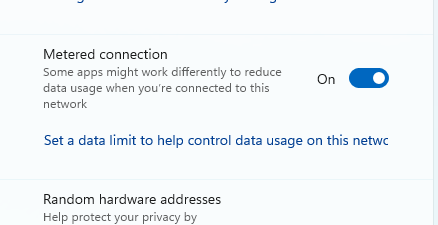
Now have a look in your task manager to see if your CPU is now running at its normal state if not then reboot Windows and check again.
See What Makes Windows Systems So Popular In Todays Time.
3. Run a System File Checking Scan
A System file checking scan (SFC for short) can check your system files for any missing or corrupted files and resolve the Windows module installer worker high CPU issue and other issues your Windows 10 or 11 operating system is running into.
1. Press the Windows key and type in CMD then right-click the CMD icon and choose Run as Administrator. then click yes when it asks if would you like cmd to make changes.
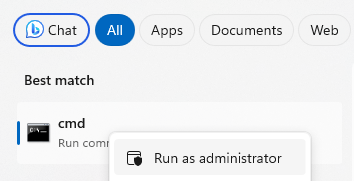
2. Now type in the command sfc /scannow and press enter which will run the scan and allow for it to finish and tell you the issues if any it has found.

3. Run The Windows Updater Trouble shooter
This is a great tool that Microsoft added to their Windows operating system which can check for numerous issues when you update Windows, failed Windows updates, or after Windows has updated your system.
Press the start icon then go to Settings > Windows Update > Troubleshoot.
Then run the Windows Updater Troubleshooter from the list.
5. Increase Your PC Or Laptops RAM
With the advancement of today’s Windows operating systems, it helps to have as much RAM as you can to avoid running into potential low RAM issues which can cause your system to hang or freeze as well as high CPU issues.
The minimum RAM needed for a Windows 10 system is 2GB so this is the minimum needed so it’s always best to have at least 4GB for a better experience with Windows 10.
For Windows 11 the minimum needed is 4GB so we would recommend 8GB to make sure you get a smooth Windows 11 experience.
If you happen to have lower RAM in your system you can choose to disable many apps, services, and programs from auto-starting when your Windows PC or laptop system starts.
1. Press the Windows key + R to bring up the run window then type in msconfig
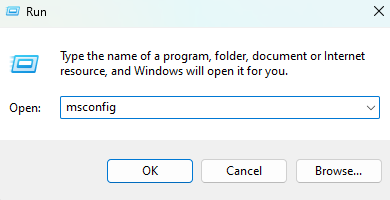
2. Now under System Configuration then General make sure you select the radio button labeled Selective Startup.
Then untick the load startup items and click on apply.

3. Next open up the Services tab and make sure you tick on Hide all Microsoft services and then click on the Disable all button.
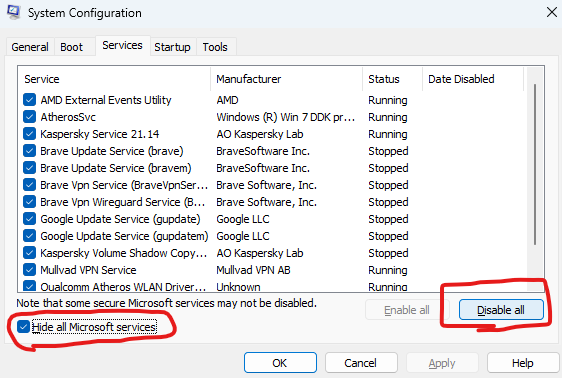
Now restart your Windows 10 or 11 PC and this should keep your RAM low which will in turn also help when the Windows module installer worker starts to go to work on your system.
6. Delete The Software Distribution Folder
After Windows has automatically downloaded any updates they will initially be put in a folder named SoftwareDistribution and then installed on your Windows system.
If any files are corrupt in the SoftwareDistribution folder then the Window module installer worker will not be able to install any of the updates it has temporarily stored inside this folder.
So to correct this issue you will need to delete the folder and reboot your Windows PC, the folder will automatically be added to your system and the Windows updates will be redownloaded via the Windows module installer worker.
1. Press the Windows key + R to bring up the run window and type in services.msc and press enter.

2. Search for Windows Update in the Windows services manager then right-click it and choose stop
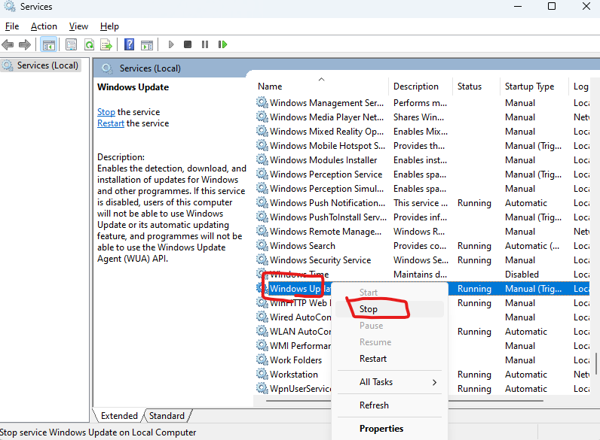
3. Now go to your Windows file explorer and type in C:\Windows\ in the address bar and locate the folder named SoftwareDistribution
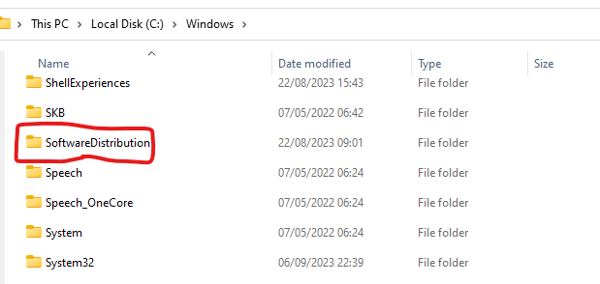
Now right-click the folder and choose Delete
Conclusion
The Windows module installer worker and its high CPU can be fixed by any 1 of the methods in this article and you have learned a lot of new knowledge when it comes to Windows Updates and how to stop, disable, and activate them.





Leave a Reply